
How to Set Up Google Drive for Free Cloud Storage — Step by Step
Last year I accidentally deleted a 40-page research document I’d been working on for two weeks. No backup. No cloud. Just — gone. That was the day I finally got serious about Google Drive.
If you’ve been putting off cloud storage because it sounds complicated or techy, I get it. I avoided it for years. But honestly? Setting up Google Drive takes about five minutes, and you get 15 GB completely free. That’s enough to store thousands of documents, hundreds of photos, and a fair amount of video.
This isn’t one of those articles that just lists features. I’m going to walk you through exactly how I set it up, share the mistakes I made early on, and show you how to actually use it so your files are safe and accessible anywhere.
First, What Is Google Drive Actually Doing?
Think of it as a hard drive that lives on the internet. When you save a file to Drive, a copy goes to Google’s servers. Your laptop could fall into a lake tomorrow and you’d still be able to open that file on any other device. That’s the whole point.
Google gives you 15 GB free, shared across Drive, Gmail, and Google Photos. For most people who aren’t hoarding 4K home videos, that’s plenty — at least to start.
Quick reality check: Google Photos counts toward your 15 GB only if you choose “Original quality” uploads. “Storage saver” mode compresses photos and used to be free — it’s now counted since June 2021. Just something to know going in.
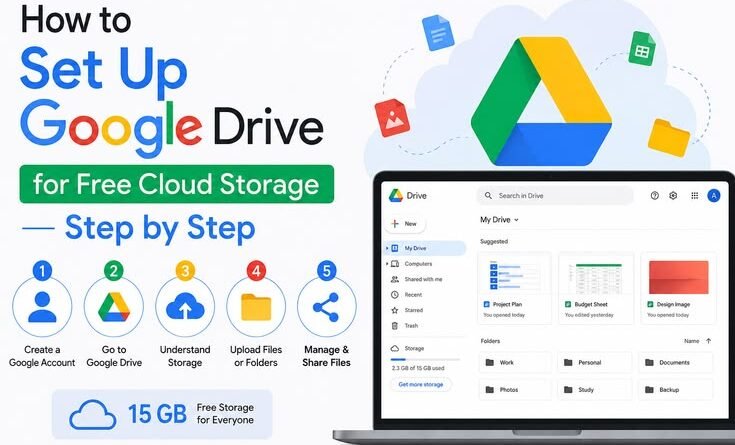
Step-by-Step: Getting Google Drive Set Up
Step 1 — Create a Google Account (Or Use the One You Have)
If you use Gmail, YouTube, or Android, you already have a Google account. That account comes with Drive baked in. Just go to drive.google.com and sign in.
If you don’t have one, it takes about 2 minutes to create at accounts.google.com/signup. Pick an email you’ll actually remember — your Drive is tied to it forever.
One early mistake I made: I created a throwaway Google account and started saving files there, then forgot the password. Use your main email. It’s not worth the headache.
Step 2 — Tour the Interface (Don’t Skip This)
Before you start uploading everything, spend two minutes understanding the layout:
- My Drive — This is your personal space. Anything you upload or create here is yours alone.
- Shared with me — Files or folders other people have shared with you appear here. They live on someone else’s Drive, but you can access them.
- Recent — Saves you time digging. The files you’ve touched most recently show up right at the top.
- Starred — Star your most important files so you can get to them instantly. I keep my current projects starred.
- Storage meter — Bottom left corner. Tells you exactly how much of your 15 GB you’ve used.
Step 3 — Upload Your First Files
Click the + New button (top-left). You’ll see two options: “File upload” and “Folder upload.” For a quick test, drag a document straight from your desktop onto the Drive window — it’ll upload on the spot. That drag-and-drop behaviour surprised me the first time; I expected it to do nothing.
Pro move: Create a folder structure before you dump 200 files in. I made the mistake of uploading everything to the root of My Drive and spent an afternoon reorganizing. Think of it like a filing cabinet — make folders for Work, Personal, Photos, etc.
Step 4 — Install the Desktop App (This Is the Game-Changer)
The web interface is fine, but the real magic happens when you install Google Drive for Desktop. Download it from google.com/drive/download — it works on Windows and Mac.
- Install the app and sign in with your Google account.
- A “Google Drive” folder appears in your File Explorer (Windows) or Finder (Mac). Anything you drop in there syncs automatically to the cloud.
- Choose between “Stream” (files stay in the cloud, downloaded on demand) or “Mirror” (a full local copy is kept on your hard drive). I use Stream to save disk space.
- Look for the little cloud icon in your taskbar — that’s your sync status indicator. Green checkmark = everything is saved.
After installing the desktop app, I stopped “saving” files manually. My Documents folder literally is my Google Drive now. It’s invisible in the best possible way.
Step 5 — Set Up on Your Phone
Download the Google Drive app (iOS or Android — it’s free). Sign in. Done, mostly. But there are two settings worth changing immediately:
- Turn off “sync on mobile data” unless you have unlimited data. Go to Settings → Data Usage and toggle it to Wi-Fi only. Learnt this after a painful data bill.
- Enable offline access for key files. Tap the three-dot menu next to any file and choose “Make available offline.” This saves you when you’re on a plane or somewhere with no signal.
The Sharing Thing — Surprisingly Powerful
This is where Drive goes from “storage” to a genuinely useful collaboration tool. Right-click any file → “Share.” You can share with a specific email address or generate a link. You can set permissions:
- Viewer — They can see the file. That’s it. Good for sharing reports or invoices.
- Commenter — They can leave feedback but not change anything. Great for getting input without risk.
- Editor — Full editing access. Use this only for teammates you actually trust with the file.
Never set a sensitive file to “Anyone with the link can view” and then paste that link in a public place. I once shared a client contract this way by accident. Google Drive’s sharing is powerful — but that also means a wrong click matters.
Common Mistakes People Make (Including Me)
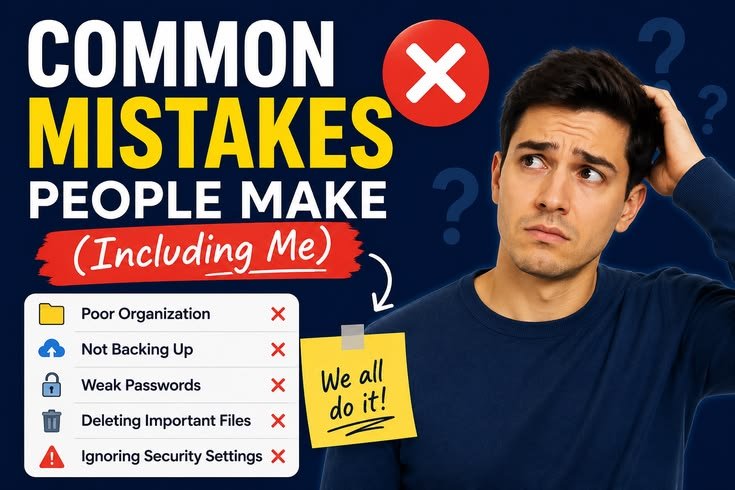
No folder structure — Dumping everything into the root makes Drive feel like a cluttered desktop. Organize from day one.
Assuming “uploaded” means “synced” — Check the sync icon. If the desktop app is paused, files may not be backed up yet.
Emptying the trash too fast — Deleted Drive files sit in Trash for 30 days. Don’t empty it immediately — you might want something back.
Forgetting Photos eats storage — Google Photos backs up to the same 15 GB. High-res photos fill that up faster than you’d expect.
What About Google Docs, Sheets, and Slides?
Here’s an underrated fact: files you create inside Google Drive using Google Docs, Sheets, or Slides take up zero storage. They’re native Google formats and don’t count against your 15 GB. So if you’re writing a lot, create documents directly in Drive instead of uploading Word files. Same work, zero storage cost.
You can even import a Word document, convert it to Google Docs format, then delete the original Word file to free up space. That’s a useful trick when you’re getting close to the limit.
When 15 GB Isn’t Enough
If you hit the limit, Google offers paid plans called Google One — 100 GB for around $2.99/month (roughly ₹190/month in India), 200 GB for a bit more. You can share the storage with up to 5 family members, which makes it excellent value if you split it.
Before paying, though, run through this quick cleanup:
- Go to drive.google.com/drive/quota to see which files are eating the most space. Large video files are usually the culprits.
- In Gmail, search for emails with large attachments: type has:attachment larger:10M in the search bar and delete old ones.
- Empty your Drive Trash and Gmail Trash. Deleted items still count toward your quota until the trash is cleared.
Real experience: I freed up nearly 4 GB just by deleting a batch of old video files I’d totally forgotten about and clearing Gmail’s spam folder. Check before you pay.
Tips I Wish I’d Known From the Start
Use keyboard shortcuts. On the web, press / to jump to search instantly. Press N to create a new document. Saves a surprising amount of time.
Version history is your safety net. Right-click any Google Doc → “Version history” → “See version history.” You can roll back to any previous version. I’ve used this more times than I’d like to admit.
Search is smarter than you think. Google’s search inside Drive can read the text inside your documents, not just file names. So you can search for a phrase you vaguely remember writing and Drive will find it.
Right-click a folder to “Add shortcut to Drive.” If someone shares a folder with you, add a shortcut so it appears in your own Drive like a regular folder. Otherwise it only lives under “Shared with me,” which is easy to forget about.
Cloud storage sounds like one of those “I’ll set it up someday” tasks — but honestly, once you’ve lived through losing an important file, the five-minute setup becomes very easy to prioritize. Google Drive isn’t perfect (the storage limit can sneak up on you, and the desktop app occasionally needs a restart to sync properly), but for free cloud storage that works across every device, it’s hard to beat.
Start with the web interface, get comfortable, then install the desktop app. That’s when it clicks. Your future self — the one who never loses a document again — will thank you.


